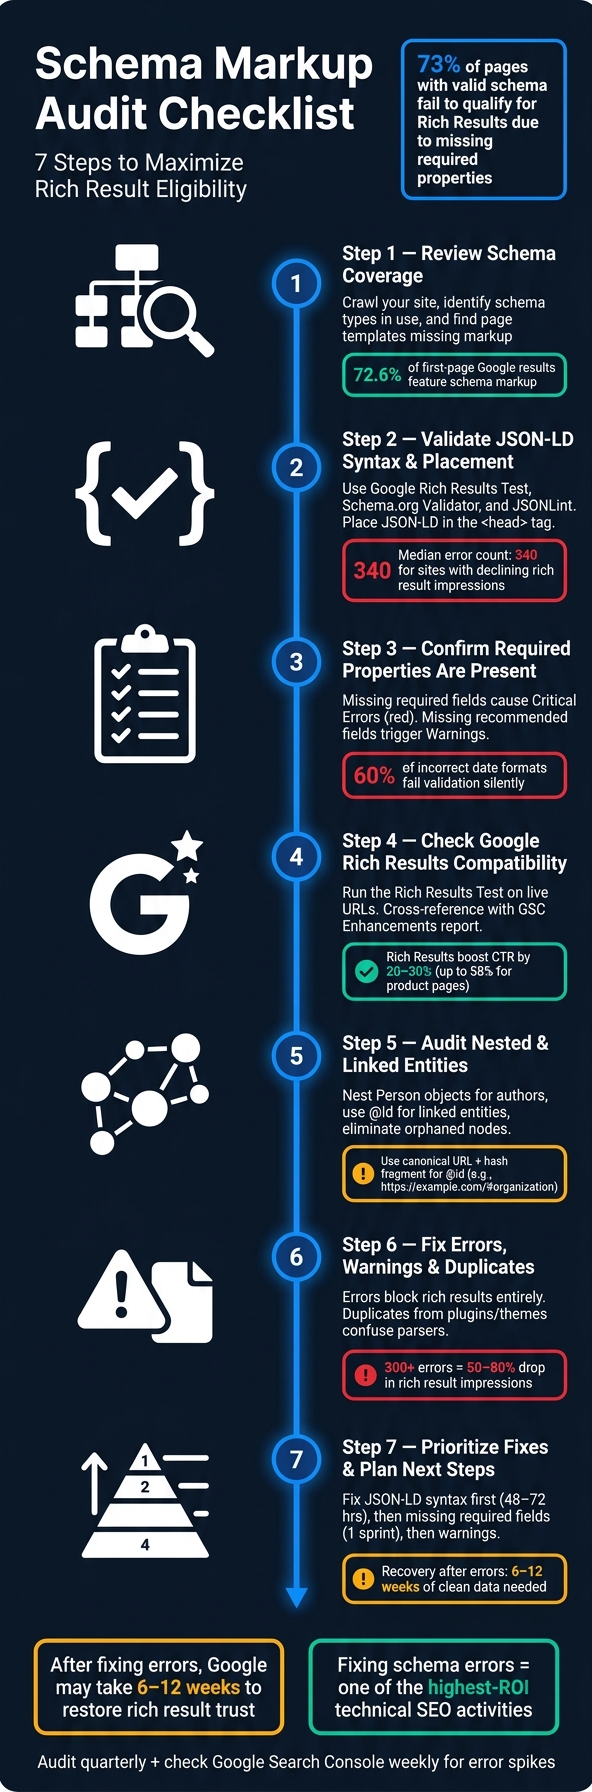
Schema markup helps search engines understand your website content better, improving visibility in search results through features like star ratings, FAQs, and product details. However, 73% of pages with valid schema fail to qualify for Rich Results due to missing required properties. A proper audit ensures your schema is accurate, complete, and aligned with Google’s guidelines.
Key Steps to Audit Schema Markup:
- Review Coverage: Identify schema types across your site and spot missing templates.
- Validate Syntax: Use tools like Google Rich Results Test and JSONLint to catch errors.
- Check Required Fields: Ensure all mandatory properties are included for each schema type.
- Fix Errors and Warnings: Address critical errors first, then tackle warnings to improve performance.
- Audit Nested Entities: Properly nest and link entities using
@idfor a connected knowledge graph. - Remove Duplicates: Consolidate schema blocks to avoid conflicts.
Why It Matters:
- Rich Results can boost click-through rates by 20–30%, with some product pages seeing increases of up to 58%.
- Errors or missing fields can lead to 50–80% drops in Rich Result impressions.
- Regular audits help maintain schema accuracy, especially after site updates or CMS changes.
By following these steps, you can ensure your structured data is optimized for both traditional search and AI-driven tools.
Schema Markup Audit: 7-Step Checklist for Rich Results
How to Use The New Schema Markup Validator
sbb-itb-f4b2e1b
Step 1: Review Schema Coverage Across the Website
Start by taking stock of your site's schema markup to determine where it's being used effectively - and where it's missing entirely.
Identify Current Schema Types in Use
Perform a full-site crawl using tools like Screaming Frog or Sitebulb, ensuring structured data extraction is enabled. This will generate a spreadsheet listing all detected schema types - like Article, Product, or FAQPage - across your URLs. For smaller sites (under 500 URLs), Screaming Frog’s free version works fine. For larger sites, you’ll need the paid version or Sitebulb.
To get a broader view, cross-check your crawl results with Google Search Console's Enhancements report. This will give you a summary of schema types, as well as any errors or warnings tied to them. For quick checks on individual pages, free Chrome extensions like enhancely Schema Viewer let you instantly see schema types and properties [8].
"A schema markup audit diagnoses rich result failures by isolating three root causes: validation errors flagged in Google's Rich Results Test, eligibility gaps where page content does not satisfy schema type requirements, and implementation drift where previously valid markup breaks after CMS updates or template changes." - Martial Notarangelo, Founder, Authority Specialist [7]
Pay attention to implementation drift, where schema might disappear after CMS updates or changes to templates. Regularly auditing your schema ensures you catch these issues early, preventing a loss of eligibility for rich results.
Once you've reviewed your current schema, the next step is to look for gaps in coverage by analyzing your page templates.
Find Page Templates That Are Missing Schema
Compare your existing schema to the different page templates on your site. Common templates include product pages, blog posts, service pages, FAQs, and more. Use a spreadsheet to organize this information, with columns for Page Template, Current Schema Type, and Target Schema Type. This will help you track which templates are properly covered and which need attention.
Here’s an example of how schema types align with common templates:
| Page Template | Recommended Schema Type | Priority |
|---|---|---|
| Product Detail Page | Product, Offer, AggregateRating | High |
| Blog Post / Article | Article, BlogPosting, Person (Author) | High |
| FAQ Page | FAQPage | Medium |
| Service Page | Service, LocalBusiness, FAQPage | Medium |
| Homepage | Organization, LocalBusiness | High |
| Contact Page | ContactPoint, LocalBusiness | Low |
Focus your efforts on high-priority templates, especially those that drive significant traffic or qualify for rich results. For instance, missing Product schema on popular product pages is a much bigger issue than not having ContactPoint schema on a contact page. Keep in mind that as of 2024, 72.6% of first-page Google search results feature schema markup [9]. Gaps in your schema coverage - especially on key templates - can put your site at a disadvantage.
Step 2: Validate JSON-LD Syntax and Placement
Once you've identified which pages include schema and which don't, the next step is to ensure that the existing schema is properly formatted and readable. Even a small mistake in formatting can disrupt the entire JSON-LD block. In a review of 22 enterprise audits since January 2026, the median structured data error count was 340 for sites with declining rich result impressions. Sites with over 300 errors often experienced 50% to 80% drops in rich result performance [12].
"A schema validator cannot help if the data is not valid JSON." - Wux Webtools Team [11]
Use Tools to Catch Errors
A two-step tool approach works best to identify issues at multiple levels. Start with the Google Rich Results Test to check eligibility for Google’s rich features. Then, use the Schema.org Validator (validator.schema.org) to ensure technical compliance. For an additional layer of security, paste your JSON-LD into JSONLint to catch basic formatting problems before diving into semantics. Be cautious when copying schema from document editors, as they can unintentionally replace straight quotes with curly quotes, which breaks JSON formatting [13].
| Error Message | Meaning | Recommended Fix |
|---|---|---|
| Missing field 'name' | A required property is absent | Add the missing property to the JSON-LD block |
| Invalid value type for field 'price' | The data type is incorrect | Ensure the value matches the expected type |
| Mismatched URLs | Schema URL does not match the canonical URL | Normalize URLs at the template level |
| Parsing error: Missing '}' or ']' | The JSON structure is broken | Use a JSON linter to find unclosed brackets |
Confirm Placement and Consistency
Once the syntax is validated, ensure the JSON-LD is placed correctly for crawlers to find it. Google advises placing JSON-LD in the <head> section within a <script type="application/ld+json"> tag [4]. This location ensures the markup is accessible during the page's initial load, rather than being discovered later.
"JSON-LD placed in the
<head>is the format Google recommends; inline Microdata creates maintenance debt at scale." - Martial Notarangelo, Founder, Authority Specialist [4]
A common issue arises with JavaScript-injected schema, such as when using client-side rendering methods like useEffect hooks or Google Tag Manager. Some crawlers, including certain AI bots, don’t execute JavaScript, making this schema invisible. To avoid this, opt for server-side rendering. To confirm what is actually being loaded, use the live URL in the Rich Results Test. This approach reveals what the rendered DOM includes, rather than just inspecting the raw source code [7][10]. Additionally, ensure the schema is not hidden behind login walls or consent banners, as these conditions will block crawlers from accessing it, no matter how accurate it is [10].
For enterprise-level websites, validating schema at the template level is critical. If the placement is correct in the template, it will automatically propagate across thousands of pages [1].
With syntax and placement confirmed, the next step is to verify that all required properties are included.
Step 3: Confirm Required Properties Are Present
Once you've validated the syntax and placement of your schema, the next step is to ensure all required fields are included. If any required fields are missing, Google's parser will disregard the entire JSON-LD block.
"If required properties are missing, search engines may still parse the structured data but deem it ineligible for enhanced search features." - seoClarity [1]
Check for Missing or Incomplete Fields
Missing required fields often result in a Critical Error (marked in red in the Rich Results Test), which blocks rich results entirely. On the other hand, missing recommended fields trigger Warnings, which limit the level of detail displayed in search results [3][5].
Here’s a quick look at some commonly missed fields by schema type:
| Schema Type | Key Required Properties | Common Missing Field |
|---|---|---|
| Product | name, image, offers (price, priceCurrency, availability) | "Either 'offers', 'review', or 'aggregateRating' should be specified" [3] |
| Article | headline, image, datePublished, dateModified, author | "Missing field 'author'", "Missing field 'datePublished'" [3] |
| LocalBusiness | name, address (streetAddress, addressLocality, addressRegion), telephone | "Missing field 'name'", "Missing field 'address'" [3] |
| FAQPage | mainEntity (Question and acceptedAnswer) | "Question with no acceptedAnswer" [5] |
| Event | name, startDate, location, offers | "Missing field 'location'", "Missing field 'startDate'" [14] |
Additionally, each field must adhere to the required format. For example, dates must follow the ISO 8601 standard with a timezone offset, such as 2026-06-11T09:00:00-05:00. During audits conducted in early 2026, 60% of cases with incorrect date formatting failed validation without showing obvious errors, leading to schema rejection [12].
For large websites, test one representative URL per CMS template instead of reviewing every single page. If a required field is missing in the template, it will be absent across all pages built from that template [1]. Ensuring that all required fields are properly included is crucial to enable rich result features.
Make Sure Entity Information Is Complete
It's not just about including the fields - they need to be structured correctly. For instance, the author property should be a nested Person object rather than plain text. This means including details like name, url, and ideally sameAs to support E-E-A-T (Experience, Expertise, Authoritativeness, and Trustworthiness) [12].
The same principle applies to Organization as a publisher or PostalAddress within a LocalBusiness. Using flat text strings instead of structured objects often results in silent rejection - markup that appears valid but fails to generate rich results [1][7].
"Critical schema errors cause the entire schema block to be ignored by Google's parser." - searchforged.com [5]
To avoid this, map your CMS fields to Google's required properties before updating the schema. If your CMS lacks fields like priceValidUntil or author URL, you'll need to address these gaps at the data level, not just in the markup [4]. Also, double-check that the schema values match the visible content on your page. For instance, if the price in your JSON-LD doesn’t align with the price displayed on the page, it could lead to a policy violation and even manual penalties [2].
Step 4: Check Compatibility with Google Rich Results
Once you've ensured your schema has validated syntax and all required properties, the next step is to confirm whether it meets Google's criteria for Rich Results. It's important to understand that technical validity doesn't automatically mean eligibility for these enhanced search features - a common misconception during audits.
"Passing validation is not the same as being eligible for rich results. Google's documentation is explicit that satisfying technical requirements is necessary but not sufficient." - Martial Notarangelo, Founder, Authority Specialist [7]
Validate Schema Against Google's Guidelines
Start by running the Google Rich Results Test on the live URL. This tool ensures that Googlebot can render any JavaScript-injected schema, which static code checks might miss. It also provides a preview of how your snippet could appear in search results [7][15].
To identify broader issues, use Google Search Console's Enhancements report. This report groups errors and warnings by schema type, making it easier to detect and fix problems affecting multiple pages. For instance, if a single broken template is flagged, it could impact hundreds of URLs at once [3][12]. Tools like Schema Validator AI can further streamline this process by integrating URL-level audits with Rich Results validation.
For additional checks, cross-reference your schema with the Schema.org Validator. While the Rich Results Test focuses on Google's specific requirements, the Schema.org Validator ensures your schema complies with the broader vocabulary standards [3][12].
Fix Errors and Warnings
Google categorizes schema issues as Errors (critical) and Warnings (non-critical). Errors prevent Google from using the schema entirely, while warnings can limit the richness or frequency of your snippets in search results [3][5].
Ignoring these issues can have serious consequences. For example, websites with over 300 errors have seen 50% to 80% drops in rich result impressions within 90 days. And once Google's trust in your domain's markup is compromised, it can take 6 to 12 weeks of error-free data to recover [12].
Here are some common error messages and how to address them:
| Tool/GSC Message | What It Means | How to Fix It |
|---|---|---|
| "Unparsable structured data" | The JSON syntax is broken | Look for trailing commas, unclosed brackets, or curly quotes [13] |
| "Missing field 'name'" | A required property is missing | Add the missing property to your JSON-LD block [3] |
| "Invalid value type for field 'price'" | Data format is incorrect | Ensure numbers and strings match the expected format [3] |
| "Either 'offers', 'review', or 'aggregateRating' should be specified" | Missing key commercial details in Product schema | Include at least one of these elements [3][13] |
| "Content-schema mismatch" | Schema describes content not visible on the page | Ensure marked-up data is visible to users [5] |
Address errors first, as they have the most significant impact. Once those are resolved, work through warnings. Focus on high-traffic templates like Product, Article, or LocalBusiness pages. Fixing issues at the template level is a powerful approach - it resolves the problem across all pages using that template [3][4].
After resolving these issues, you'll be ready to dive into auditing nested and linked entities in Step 5.
Step 5: Audit Nested and Linked Entities
Once you've tackled errors and warnings, it's time to focus on the nested and linked entities in your schema. This step is all about refining how your schema elements connect to create a well-structured knowledge graph.
Check Nested Relationships for Accuracy
Take a close look at how your schema entities are nested. Nesting involves placing one entity inside another to reflect their relationship. For example, an Article schema should include a nested Person object for the author. Instead of just listing the author's name as plain text, you should include a detailed Person object with properties like name, url, and sameAs. This approach strengthens your E-E-A-T signals and makes your schema more robust [4].
"Flat, unnested markup can hinder rich result eligibility." - Martial Notarangelo, Founder, Authority Specialist [4]
This principle applies across schema types. For instance:
- A
Productschema should have nestedoffersorreviewarrays. - An
FAQPageschema requires eachQuestionto include a nestedacceptedAnswer. Without this, your FAQ won't qualify for rich results [5].
Before diving into your audit, map out which entities should nest within others for each page type. This preparation will make it easier to identify gaps or errors. Use tools like the Schema.org Validator to catch issues where the markup might be valid but doesn't make logical sense - such as improperly nesting a Product inside an Article in a way that search engines won't recognize [4].
Once you're satisfied with the nesting, move on to ensuring that linked entities use consistent @id values to tie everything together.
Use @id Correctly for Linked Entities
While nesting connects entities directly, linking through @id references allows you to unify your schema into a single, cohesive graph. This method ensures that your schema isn't just a collection of disconnected pieces but a well-connected structure.
To do this, assign a unique @id to every core entity. A common practice is to use the canonical URL of the entity's main page, followed by a hash fragment (e.g., https://example.com/#organization). Consistently applying this pattern across your site helps maintain a unified entity graph [3][6].
"If your organization appears in Article, Product, BreadcrumbList, and FAQPage data, using the same @id helps consumers understand that these are references to the same entity, not four unrelated organizations with the same name." - Wux Webtools [11]
During your audit, look for orphaned nodes - entities in your JSON-LD that lack an @id or a clear relationship to a parent entity. These isolated nodes don't contribute to your knowledge graph and can dilute its effectiveness. Reviewing the @graph structure in your JSON-LD is a quick way to identify and address these issues [7][6].
Common Nesting Mistakes and Fixes
Here’s a quick guide to common nesting issues and how to resolve them:
| Common Nesting Mistake | Impact | Recommended Fix |
|---|---|---|
| String-only authors | Weak E-E-A-T signals | Use a Person object with name, url, and sameAs properties |
Missing acceptedAnswer |
FAQ rich result failure | Always nest an Answer object within each Question |
Inconsistent @id across pages |
Disconnected entity graph | Standardize @id patterns site-wide (e.g., /#organization) |
Isolated nodes in @graph |
Breaks schema connections | Link every entity to a parent or assign a stable @id |
Duplicate schema blocks with conflicting @id |
Confusing search snippets | Combine into a single @graph |
Step 6: Find and Fix Errors, Warnings, and Duplicates
Once you've refined your nested entities, it's time to tackle remaining technical issues. This means addressing errors, warnings, and duplicate schema blocks - issues that can seriously impact schema performance.
Differentiate Errors from Warnings
Let’s break it down. Errors are major roadblocks - they violate Schema.org specifications or Google’s essential requirements. When errors exist, Google’s parser ignores the entire schema block, stripping away any chance of rich results. While the page itself still gets indexed, you lose the enhanced visibility rich results provide.
Warnings, on the other hand, are less severe. They indicate missing recommended properties. Your schema will still be valid, but the snippet might not be as detailed. For instance, if an Article schema is missing the image property, it could limit eligibility for features like Top Stories [3].
Here’s why fixing errors is crucial: sites with over 300 errors can lose 50–80% of their rich result impressions, while those with 100–300 errors might see a 15–35% drop over 90 days [12]. Once errors are fixed, it can take Google 6 to 12 weeks of clean data to rebuild trust [12]. Start with errors to restore eligibility, then tackle warnings to improve your SERP presence and click-through rates.
| Type | Effect | Priority |
|---|---|---|
| Error | Blocks rich result eligibility entirely | Fix immediately |
| Warning | Reduces snippet detail or depth | Fix after errors are resolved |
To uncover issues, use tools like the Schema.org Markup Validator first, then follow up with Google’s Rich Results Test. The second tool often catches errors the first might miss.
Once errors and warnings are resolved, shift your focus to removing duplicate schema blocks.
Find and Remove Duplicate Schema
After resolving syntax and completeness issues, the next step is to eliminate duplicate schema. This is a common but frequently overlooked problem in schema audits. Duplicates often happen when multiple sources (like plugins or templates) output markup for the same entity on a page [16][1]. This results in conflicting JSON-LD blocks, which can confuse search engines and lead to your markup being ignored.
"Schema markup rarely fails because a team forgot it exists. It fails because no one owns it over time." - Noah Blake, SEO Specialist [16]
To find duplicates across your site, crawl it with structured data extraction enabled. This allows you to export all detected schema types and flag pages where the same @type appears more than once. Once you’ve identified the source of the duplicates, fix it at the template level rather than addressing each page individually [7][4].
Be especially vigilant after WordPress plugin or theme updates, as these updates are a common source of silent duplicate blocks [4]. When consolidating, use @id references to link related entities into a single, unified graph. This approach avoids redundancy and ensures your schema stays clean and effective [2].
Step 7: Prioritize Fixes and Plan Next Steps
Now that you've worked through the earlier steps and tackled key issues, it's time to prioritize the remaining fixes. This step is all about addressing errors in the right order to get the best SEO results. If you start with the wrong fixes, you risk wasting time and effort.
Address High-Priority Fixes First
Start with the most pressing problems: incorrect JSON-LD syntax. If Google can't understand your structured data because of broken brackets, commas, or other syntax issues, nothing else will work. Fixing these errors ensures your markup is readable. Once that's done, focus on high-traffic templates where missing required fields - like those on Product or FAQ pages - are blocking rich result eligibility.
After addressing errors, move on to warnings for high-traffic pages. For instance, adding recommended properties like review or aggregateRating to product pages can increase click-through rates by anywhere from 15% to 35%, depending on the search query [17]. Warnings on less-trafficked pages can be grouped into routine maintenance tasks and handled later.
| Priority Level | Issue Type | Recommended Action | Resolution Timeline |
|---|---|---|---|
| Critical | Incorrect JSON-LD Syntax | Fix syntax; re-validate | 48–72 hours |
| High | Missing Required Fields | Add to high-traffic templates | 1 sprint |
| Medium | Missing Recommended Fields | Add to priority pages for better CTR | Next sprint |
| Low | Issues on Low-Traffic Pages | Batch with general maintenance | Quarterly |
Group Fixes by Template or Schema Type
To fix issues efficiently, work at the template level. When you see the same error repeated across hundreds of pages, it's often due to a shared template. Correcting the template resolves the issue across your site in one go.
"Fixing structured data errors is one of the highest-ROI technical SEO activities available - often requiring less than a day of developer time for substantial gains." - Guy Sheetrit, CEO, Over The Top SEO [17]
Start by mapping your page templates - like product pages, blog posts, or service pages - to their respective schema types and any known errors. Then, apply fixes directly in your CMS templates, theme files (e.g., Shopify's product.liquid), or SEO plugin settings. Once you've made changes, test 3–5 URLs from each updated template to confirm that dynamic variables are populating correctly. Finally, use the Enhancements report in Google Search Console to track the number of valid pages versus error pages and catch any new issues early.
This organized, template-focused method ensures consistency across your site and helps you avoid repetitive fixes while keeping your structured data in top shape.
Conclusion: Keep Schema Accurate for Better SEO
Keeping schema accurate and up-to-date is an ongoing task. Google frequently updates its requirements for rich results, meaning schema that was valid yesterday might not meet today’s standards [7][1]. Beyond traditional search, AI-driven tools like AI Overviews are increasingly dependent on well-structured data to reference sources effectively. As Suraj Lalchandani, Product Manager at seoClarity, explains:
"As AI search engines increasingly rely on structured signals, schema accuracy and consistency are becoming foundational, not optional, for enterprise SEO." [1]
For example, in April 2026, a B2B SaaS company made adjustments to its Article and FAQ schema and updated author sameAs links. The result? A 13-point increase in Perplexity citation share and a 10% boost in demo conversions [6]. This demonstrates how proper schema maintenance can lead to tangible business outcomes.
Using the 10-step checklist as a foundation, regular schema audits are essential to maintaining SEO performance. Make it a habit to check Google Search Console weekly for any error spikes and conduct a full site audit quarterly or after significant updates. Often, site changes can lead to markup issues, causing a sudden loss of rich results [7].
"Rich results are a privilege, not a guarantee. When they disappear, the culprit is often a mix of guideline changes, content mismatch, or markup decay." - Jacob B, Internetzone I [2]
FAQs
Why can valid schema still fail to show Rich Results?
Valid schema might not always result in Rich Results because Google has tightened its requirements. For instance, missing recommended fields or having thin content can prevent Rich Results from appearing. Technical issues, such as problems with JavaScript rendering or changes to your CMS or template, can also disrupt schema visibility.
Beyond technical validity, Google evaluates elements like content quality, query relevance, and page authority before deciding whether to display Rich Results. Even perfectly implemented schema won't guarantee visibility if these factors don't align with Google's standards.
How do I stop schema from breaking after CMS or template updates?
To keep your schema intact after CMS or template updates, it's smart to use JSON-LD. Unlike inline markup, JSON-LD works independently of your HTML structure, making it less vulnerable to design changes.
Another tip? Dynamically populate schema properties using CMS variables. This way, any updates to your content will automatically reflect in your schema.
For extra peace of mind, add schema validation to your deployment pipeline. Use JSON linting tools to catch errors before they go live. And don’t forget to regularly check Google Search Console’s Enhancement reports to spot and fix any issues early.
What’s the best way to use @id to link entities site-wide?
To ensure consistent recognition of core entities like your organization, person, or brand across your website, assign a unique and stable @id to each entity. Use this @id consistently on all relevant pages. This helps search engines understand that references point to the same entity.
It's also important to double-check that the @id on your homepage matches the publisher or organization ID used on other pages. Mismatched IDs can disrupt the entity graph, causing confusion for search engines.