If you use Webflow, adding JSON-LD usually comes down to three steps: pick the right schema type, place it in the right spot, and test the live URL.
I’d keep it that simple:
- Use Page Settings for whole-page schema
- Use an Embed block for section-level schema
- Use CMS fields for dynamic schema on template pages
- Test with Google’s Rich Results Test and validator.schema.org
- Make sure dates, prices, and URLs use the right format
JSON-LD helps Google understand what your page data means. That can make your page eligible for rich results like FAQ dropdowns, product price info, star ratings, and article details. The article also points out that pages with valid schema are cited about 25% more often in AI search results.
A few mistakes cause most schema problems in Webflow:
- Missing the
<script type="application/ld+json">wrapper - Using relative URLs instead of full URLs
- Binding Rich Text fields that output HTML
- Leaving required CMS fields blank
- Adding the same schema type twice on one page
- Using prices like "$29.00" instead of
29.00withUSD
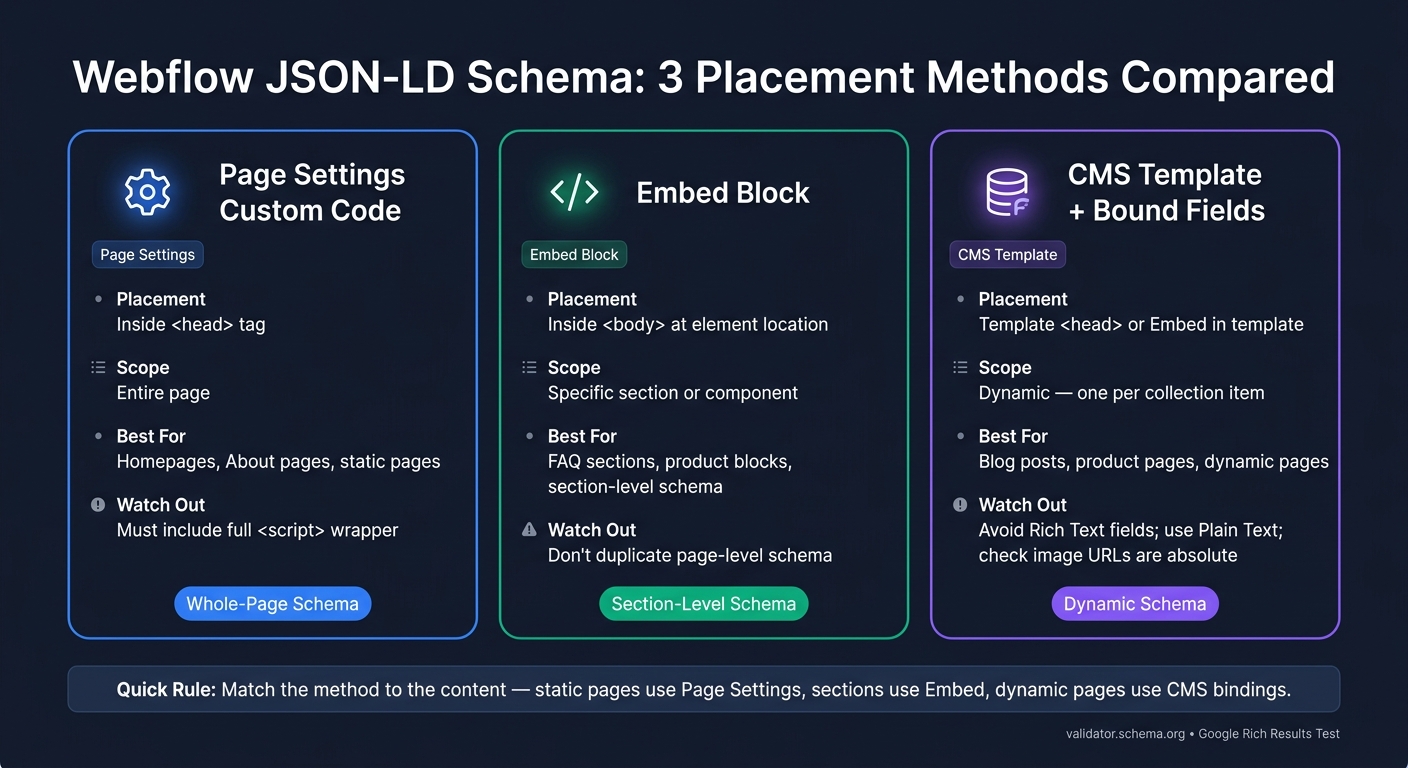
Here’s the short version of where each method fits:
| Method | Best for | Main thing to watch |
|---|---|---|
| Page Settings | Static, whole-page schema | Put it in the <head> |
| Embed block | One page section, like FAQs | Don’t duplicate page-level schema |
| CMS template + bound fields | Blog posts, products, dynamic pages | Check field output, especially dates and image URLs |
The core idea is simple: match the markup to what people can see on the page. If the page shows a product, use Product. If it shows a blog post, use Article. If it lists questions and answers, use FAQPage.
Below, I’d walk through the setup, placement, field mapping, and testing flow in plain steps so you can add schema without breaking your Webflow build.
Schema markup in Webflow to boost your SEO + AI visibility
sbb-itb-f4b2e1b
Plan Your Schema Before Adding It to Webflow
Plan the schema type, required fields, and data source before you open Webflow. That small step cuts down on mismatches and cleanup later. Then map each page type to one schema type before you paste anything into Webflow.
Choose the Right Schema Type for Each Page
Match each schema type to content people can actually see on the page. If you mark up a price that doesn’t appear on the page, that can trigger a manual action [5][1].
Here’s a simple way to decide what belongs on a static page, CMS template, or site-wide block:
| Webflow Page Type | Schema Type | Key Properties |
|---|---|---|
| Homepage | Organization, WebSite |
name, url, logo, sameAs |
| Blog Post | Article / BlogPosting |
headline, author, datePublished, image |
| Product Page | Product |
name, image, offers (price, priceCurrency), brand, availability, sku |
| FAQ Section | FAQPage |
mainEntity (Question, acceptedAnswer) |
| Service Landing Page | Service / LocalBusiness |
name, description, provider, address, openingHours |
| Site-wide | BreadcrumbList |
itemListElement (position, name, item) |
Don’t repeat the same schema type on a single page. Two Organization blocks, for example, can confuse crawlers instead of helping them [2][3][1].
List Required and Optional Properties
Before you touch Webflow, write down the exact fields you need. For Article, that includes a headline under 110 characters, an author with a name and URL, a datePublished in ISO 8601 format, and an absolute image URL [4]. For Product, you need name, image, description, brand, and an offers object with both price and priceCurrency [7]. For FAQPage, each question needs a name and an acceptedAnswer with a text value [5].
It also helps to split fields into two buckets:
- Static values: keep these in Page Settings or an Embed block
- CMS-driven values: pull these from bound CMS fields
One more thing: don’t map a Webflow Rich Text field straight into JSON-LD. Hidden HTML can break the script, so use a plain text field instead [6][4].
Generate or Validate Your JSON-LD Before Adding It to Webflow
Hand-written JSON-LD is easy to break, even with a tiny typo, so audit and validate it before adding it to Webflow [3].
Schema Validator AI can audit a URL, generate JSON-LD, and check Rich Results eligibility before you paste the code into Webflow.
Once your schema is mapped and checked, you’re ready to place it in the right Webflow location.
Add JSON-LD to Static Webflow Pages
Webflow JSON-LD Schema: 3 Methods Compared
For static pages with fixed schema values, there are two main ways to add JSON-LD in Webflow: Page Settings custom code or an Embed block.
Paste Schema in Page Settings Custom Code
Use Page Settings when the schema applies to the whole page. In Webflow Designer, open the Pages panel and click the gear icon next to the page you want to edit. Then scroll to Custom Code. You’ll find two fields there: Inside <head> tag and Before </body> tag.
Paste your JSON-LD into the Inside <head> tag field, and make sure you include the full wrapper:
<script type="application/ld+json">
{
  "@context": "https://schema.org",
  "@type": "Organization",
  ...
}
</script>
If you leave out <script type="application/ld+json">, Webflow treats the code like plain text, and search engines ignore it. In most cases, the <head> field is the right spot. Use Before </body> only if you specifically need body-level placement.
Once the schema type is mapped, pick the placement that fits the page layout.
Use an Embed Block for Page-Level Control
Use an Embed block when the schema belongs to one part of the page instead of the page as a whole. Drag an Embed element onto the page from the Add panel, then paste in the JSON-LD with the full <script> wrapper.
This works well for section-based schema. A common example is FAQPage markup placed right inside an FAQ section. In short, Embed blocks are best for schema tied to one section, not for static markup meant for the whole page.
There’s one easy mistake to avoid: don’t place the same schema type in both Page Settings and an Embed block on the same page. Duplicate or conflicting markup can hurt rich result eligibility and make things harder for crawlers to read.
Use this method only when the markup belongs to a single page section, not when the content is pulled from CMS fields.
Page Settings vs. Embed Block: A Side-by-Side Comparison
| Feature | Page Settings Custom Code | Embed Block |
|---|---|---|
| Placement | Inside the <head> tag, which is preferred |
Inside the <body> at the element's location |
| Scope | Entire page | Specific section or component |
| Best Use Case | Homepages, about pages, standard static pages | Section-specific schema like FAQ or a product block |
Use Page Settings for whole-page schema and Embed blocks for section-level markup. Static pages use pasted code. CMS templates use bound fields.
Add Dynamic JSON-LD with Webflow CMS
When schema values change from one item to the next, pasted code stops being enough. At that point, it makes more sense to tie your JSON-LD to CMS fields so each collection item prints its own markup. On CMS template pages, you can bind fields right into the JSON-LD output. Use the template <head> for page-level schema, or drop an Embed where you need markup for a specific section.
Insert JSON-LD in a CMS Template with Bound Fields
Open a Collection Template page in Webflow Designer, like your Blog Post template. Add an Embed element and paste in your JSON-LD script. Then use the purple Add Field button to connect CMS fields to each dynamic value [2][1].
Here’s a basic Article example:
<script type="application/ld+json">
{
  "@context": "https://schema.org",
  "@type": "Article",
  "headline": "{{Name}}",
  "datePublished": "{{Publish Date}}",
  "author": {
    "@type": "Person",
    "name": "{{Author Name}}"
  },
  "image": "{{Featured Image}}"
}
</script>
Put bound fields inside double quotes, and use absolute URLs for image and page fields. That matters because Webflow CMS image fields can return relative paths [2][4]. Also, don’t bind Rich Text fields straight into schema properties. HTML like <p> can break your JSON-LD. A better move is to make a separate Plain Text field, such as Summary (Plain Text), and bind that to description [6].
Set Up Article, FAQPage, and Product Schema from CMS Data
You can use the same field-binding approach for other collection-based content too.
For Article schema, bind headline to the post Name field, datePublished to the Publish Date field, author to an Author reference field, and image to the Featured Image. Webflow date fields often output in ISO 8601 format, such as 2026-07-12, but it’s still smart to check the rendered page source after publishing [1][3].
For FAQPage schema, you need an array of question-and-answer pairs. Since Embed blocks don’t loop through items, set up paired Plain Text fields for each question and answer, then map them into the JSON array. The schema also needs to match what users can see on the page. If the markup says one thing and the page shows another, validation can fail [5].
For Product schema, include an offers object with price and priceCurrency, and add availability if you can. Set priceCurrency to a static value like "USD", bind price to your Price field, and map name, description, and image to matching CMS fields. Empty price fields will break validation, so either make that field required or hide the Embed when the price is blank [2][1][3].
Before launch, validate the published URL and look for missing properties, bad values, and formatting mistakes.
Dynamic Schema by Content Type: A Comparison Table
| Schema Type | Required Properties | Typical CMS Fields | Common Validation Issues |
|---|---|---|---|
| Article | headline, author, datePublished, image |
Name, Author (Ref), Publish Date, Featured Image | Missing datePublished; relative image URLs [2][4] |
| FAQPage | mainEntity (Question, Answer) |
Question 1–6, Answer 1–6 (Plain Text) | HTML tags from Rich Text breaking JSON; schema content not matching visible page text [6][5] |
| Product | name, image, price, priceCurrency |
Product Name, Main Image, Price, Currency (static "USD") | Empty price field; missing offers object; incorrect priceCurrency format [2][1] |
Once the template is printing the right values, publish one item and inspect the live source.
Test, Fix, and Maintain Your Webflow Schema
Once your live page shows the right values, publish the site and test the live URL on your custom domain. Don't treat the Webflow Designer preview as the final check. Use the published page instead.
Then check the rendered page in Google's tools.
Publish and Test for Rich Results
Run the production URL in Google's Rich Results Test to see if the page is eligible and whether any required properties are missing. For syntax checks, run that same URL through the Schema Markup Validator at validator.schema.org. After Google indexes the page, watch for issues in Google Search Console's Enhancements report.
Fix Common JSON-LD Errors in Webflow
Most Webflow schema problems come back to the same few issues. If validation fails, fix the markup, republish, and test again.
| Error | Validation Message | Fix in Webflow |
|---|---|---|
| Malformed JSON | "Syntax error" or "Invalid JSON" | Check for missing commas, unescaped quotes, or extra braces in CMS fields or the Embed block |
| Empty CMS field | "Missing required property" | Make the field required, or hide the Embed when it is blank. |
| Relative image URL | "Invalid URL format" | Use an absolute URL, or prepend your domain before the path |
| Wrong date format | "Invalid date format" | Make sure CMS date fields output ISO 8601 format, such as YYYY-MM-DD |
| Duplicate schema | "Duplicate @type detected" | Remove the duplicate block from Page Settings or the Embed block. |
| Price with "$" symbol | "Invalid price format" | Bind a number-only field to price and set priceCurrency to USD. |
After you fix any issues, republish and retest the live URL to make sure the errors are gone.
Conclusion: A Simple Workflow for Adding Schema in Webflow
The workflow is simple: choose the schema type, map fields, add the markup, bind CMS data, and validate the live URL before publishing.
Schema Validator AI can generate, audit, and validate schema as your content changes.
FAQs
How do I choose the right schema type?
Choose the schema type that best matches the visible content on the page. Your markup should mirror what people can actually see. If it doesn’t, search engines may flag it or ignore it.
For example:
- Use Organization or WebSite for a homepage
- Use Article or BlogPosting for a blog post
- Use Product for a product page
- Use FAQPage for pages with clear questions and answers
If you’re not sure which one fits, Schema Validator AI can help you check compatibility.
Should I use Page Settings or an Embed block?
You can use either option. It depends on what you need.
Use Page Settings when you want to add schema to specific static pages or CMS template pages. Use an Embed block when you want the schema code inside the page content or in a certain part of the page body.
No matter which route you take, stick to one source of truth so you don’t end up with conflicting data.
Why is my Webflow schema not validating?
Usually, rich results fail because of structural mistakes, missing required fields, or content that doesn’t match the page. Schema Validator AI can help flag the errors that stop rich results from showing, along with warnings that can hurt performance.
Some of the most common problems are pretty simple:
- Syntax errors in the JSON-LD
- Relative URLs instead of absolute URLs
- Duplicate or wrong schema types
- Broken CMS bindings that leave placeholders in place of live data
One more thing matters a lot: your JSON-LD should match the content people can actually see on the page. If the markup says one thing and the page shows another, that mismatch can cause problems fast.