If your Shopify store has more than a handful of products, bulk JSON-LD is the only sane way to keep schema accurate. The basic workflow is simple: audit what your theme already outputs using a schema markup audit checklist, map each page type to the right schema, generate templates with AI, connect them to Liquid variables, and test before publishing.
Here’s the short version:
- Check for duplicate
Productschema first, especially from review apps like Judge.me, Yotpo, or Loox. - Map schema by template:
OrganizationandWebSitefor site-wide pages,Productfor product pages,CollectionPagefor collections,Articlefor blog posts, andFAQPagefor FAQ sections. - Standardize fields before generation: use
49.99instead of$49.99, set currency to USD when that’s your store currency, use schema.org availability URLs, and fill in brand, SKU, and GTIN where possible. - Use Liquid variables instead of hardcoded values so price, stock, and URLs stay synced.
- Test 3–4 page types first: simple product, variant product, sale product, and out-of-stock product.
- Validate after launch with Google Rich Results Test, Schema.org Validator, Search Console, and bulk audit tools.
One stat stands out: products with schema can appear in AI-generated recommendations 3x to 5x more often than products without it. So this isn’t just about rich results. It’s also about making your catalog easier for search engines and AI systems to read.
A few details matter more than most:
- Put site-wide schema in
theme.liquid - Put product schema in product sections or snippets
- Use
| jsonon text fields like{{ product.title | json }} - Use
money_without_currencyfor prices - Test changes in a duplicate theme, not your live one
If I had to boil the article down to one line, it would be this: build one clean schema pattern per template, connect it to Shopify data, and keep checking it after theme or app changes.
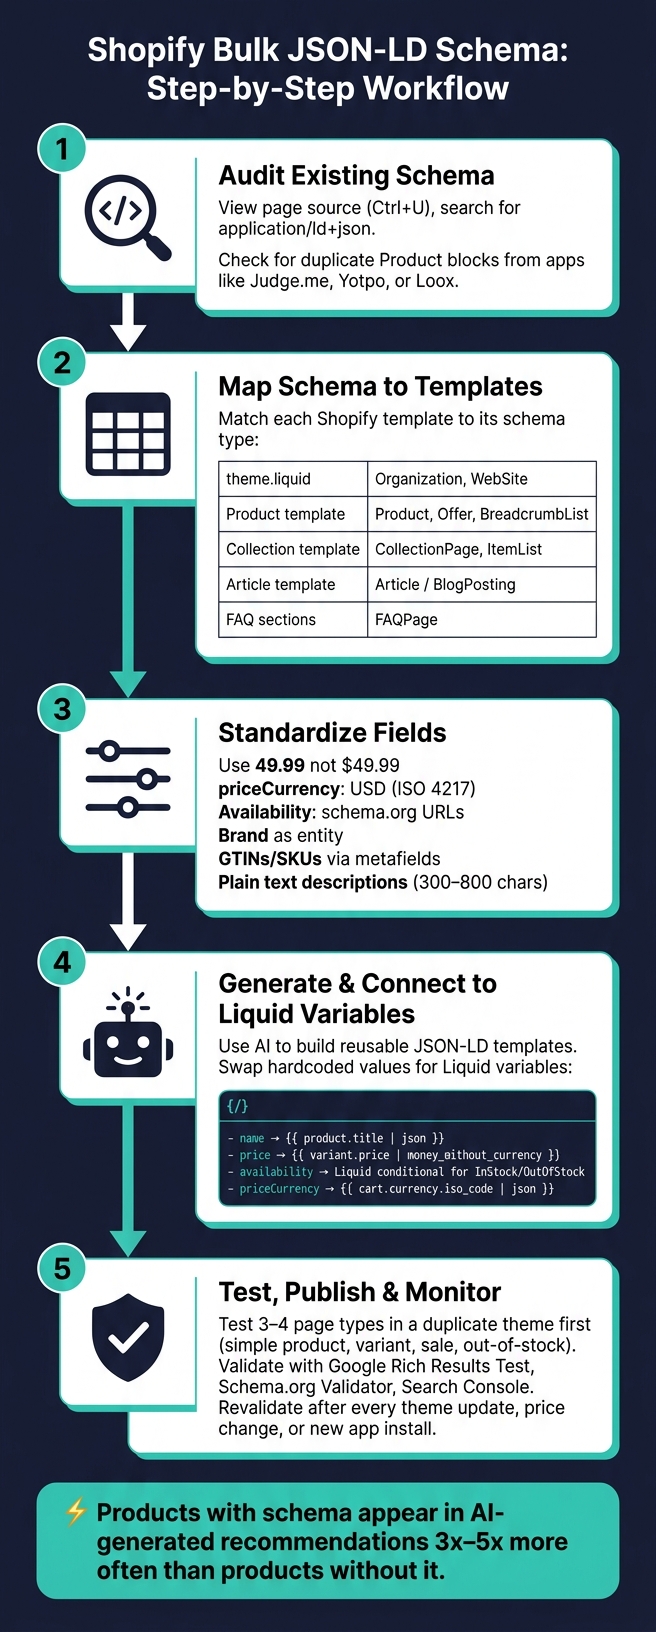
Shopify Bulk JSON-LD Schema: Step-by-Step Workflow
Adding FAQs and FAQ Schema To Shopify Products Descriptions In Bulk With AI

Map Your Shopify Pages and Data Before Generating Schema
Skip the audit, and things get messy fast: duplicate markup, missing properties, and schema that doesn't fit the page. This step gives you the repeatable schema map AI can use when you generate markup at scale.
Audit Existing JSON-LD in Your Theme
Open a live product page, press Ctrl+U (or Cmd+U on Mac) to view the page source, then search for application/ld+json. Each script block you find is JSON-LD schema that already exists on the page.
Most Shopify themes output a basic Product block. But they often leave out properties like aggregateRating, GTIN, and FAQPage [7][1]. Make note of which schema types are already there and which ones are missing. Also check whether a review app like Judge.me, Yotpo, or Loox is adding its own Product block on the same page.
If you find two top-level Product blocks, don't let both run as full product schema. Set the app to add ONLY the missing properties, such as aggregateRating, to the theme's current block instead of outputting a second Product block. Run this check on at least three to four product types: one with reviews, one without, one with variants, and one out-of-stock item [5][4].
Once you know what's already in place, match each template to one schema pattern before you generate anything in bulk.
Match Schema Types to Shopify Templates
Use these template-to-schema pairings as your blueprint for bulk generation:
| Shopify Template | Schema Type | Key Fields |
|---|---|---|
Site-wide (theme.liquid) |
Organization, WebSite |
Store name, logo, sameAs social links, SearchAction URL |
| Product template | Product, Offer, BreadcrumbList |
Name, SKU, GTIN, price, availability, brand, aggregateRating |
| Collection template | CollectionPage, ItemList |
Collection name, description, product URLs |
| Article template | Article / BlogPosting |
Headline, author, datePublished, dateModified, featured image |
| FAQ sections | FAQPage |
Question name, accepted answer text |
| About / Contact pages | Organization, ContactPage |
Address, telephone, email, founding date |
Start with theme.liquid for site-wide entities. Then move to product, collection, and article templates. That order helps keep Liquid variables in the right scope and cuts down on schema resolving the wrong data [7][8].
These pairings become the rules AI will reuse across every matching template. Once the mapping is set, AI can output the same schema structure across the store without manual rewrites.
Standardize the Fields AI Will Use
AI output is only as clean as the data you feed it. Before bulk generation, standardize price, currency, availability URL, brand, GTIN/SKU, and plain-text descriptions.
"A product that declares '@type':'Product' with name, price, brand, GTIN, rating, return policy, and shipping details wins over a product that declares only name and price." - Hamza Taj, Shopify Developer [6]
In practice, that means:
- Prices must use numeric decimals -
49.99, not$49.99- withpriceCurrencyset toUSDusing the ISO 4217 code. - Availability must use a schema.org URL like
https://schema.org/InStock, not plain text like "In Stock." - Brand should be a
Brandentity with a name and URL, not just a text string. - GTINs and SKUs should be filled in through Shopify product fields or stored in metafields if they aren't part of the default admin.
- Descriptions should be plain text, with HTML stripped out, and kept to 300–800 characters with concrete specs.
Clean fields help AI generate consistent schema from the start.
Generate JSON-LD in Bulk with AI Tools for Shopify
With your schema map and standardized fields set, you can move from planning to production. The idea is simple: build the pattern once, then use it across your catalog.
Use AI to Build Repeatable Schema Templates
Take the field map you already set up and create one JSON-LD template for each Shopify page type. Schema Validator AI can turn that map into reusable JSON-LD patterns. Pair each pattern with Shopify Liquid variables instead of hard-coded values, so the markup stays in sync as prices, stock status, and variants change.
For a product template, create a Product schema that pulls from Liquid variables for title, price, availability, brand, and SKU. Tell it to use only fields that already exist in Shopify. That helps you avoid made-up GTINs, review ratings, or other data your store doesn’t have.
A reusable template might use {{ product.title | json }} for name, {{ product.selected_or_first_available_variant.price | money_without_currency }} for price, and a Liquid conditional for availability. Once that template is stable, you can apply it across similar products without rewriting the markup each time.
Use Schema Validator AI for Audits, Generation, and Export
If you want a faster process, Schema Validator AI can handle the audit, generation, and export steps in one place. Schema Validator AI audits URLs, detects page types, generates JSON-LD, validates Rich Results eligibility, and exports markup for Shopify.
Test a Small Batch Before a Store-Wide Rollout
Before you apply the template across the full store, test it on a small batch of real Shopify pages. Run 3–4 sample pages through Google's Rich Results Test right away: one simple product, one with variants, one on sale, and one out-of-stock item [5].
That small test run can catch edge cases fast. For example, a price conditional may fail when a variant is unavailable, even if it looks fine on a standard product page. Scale up only after prices, availability, and page-level data pass validation.
sbb-itb-f4b2e1b
Add Bulk-Generated JSON-LD to Your Shopify Theme
Once your templates are validated and your small batch passes testing, it’s time to put them into your theme. Do that in the right files, and do it without touching the live theme.
Place Schema Snippets in the Right Theme Files
A safer setup is to create dedicated snippet files, like snippets/schema-product.liquid, and render them from the matching template with a {% render %} tag. That keeps edits in one place, which makes upkeep a lot less messy.
Put site-wide schema such as Organization and WebSite in the <head> of layout/theme.liquid [8][9]. Add product schema in sections/main-product.liquid for OS 2.0 themes, or render it from a product snippet [8][9]. Collection and article schema should sit in the template or section that builds those pages [8][9].
Before you add anything, search your theme files for application/ld+json. That helps you spot any schema blocks already in place, so you don’t end up with duplicate markup [1][9].
Once the snippet is added, the next step is to hook each field up to Shopify data. If you are new to structured data, reviewing schema markup basics can help you understand how these fields impact search visibility.
Connect AI-Generated Markup to Liquid Variables
Hardcoded JSON-LD gets old fast. If a product price changes or a variant sells out, those static values stop matching the live page. The fix is simple: swap the hardcoded values in your generated template for the matching Shopify Liquid variables.
Always use the | json filter on string values - for example, {{ product.title | json }} - because it handles quotes and special characters that can break JSON syntax [9][4]. For prices, use money_without_currency so the output is a plain decimal like 89.99 instead of $89.99. If you leave the dollar sign in the price field, Google’s Rich Results Test will fail it [6][3]. Pull the currency code from {{ cart.currency.iso_code | json }} instead of hardcoding "USD", especially if you use Shopify Markets.
| Schema Property | Shopify Liquid Variable |
|---|---|
name |
{{ product.title | json }} |
price |
{{ product.selected_or_first_available_variant.price | money_without_currency }} |
priceCurrency |
{{ cart.currency.iso_code | json }} |
sku |
{{ product.selected_or_first_available_variant.sku | json }} |
availability |
{% if product.available %}https://schema.org/InStock{% else %}https://schema.org/OutOfStock{% endif %} |
url |
{{ shop.url | append: product.url | json }} |
Test Changes in a Duplicate Theme First
Don’t push bulk schema edits straight to your live theme. Go to Online Store > Themes > Actions > Duplicate to make an unpublished copy. Add your snippets there, then right-click a product page in the preview and choose View Page Source. Search for application/ld+json to make sure the schema is in the HTML itself, not injected only after page load [8][4].
Before publishing, validate your schema markup by re-testing the same sample pages in the duplicate theme.
Use the duplicate theme as your last check before moving into ongoing monitoring.
Validate, Monitor, and Maintain Schema Across Your Store
With your duplicate theme tested and ready to go live, the job isn’t over. Once you publish, check your markup on a regular basis so it still matches what shoppers see on the page. Use the same page types and fields you mapped earlier - price, availability, SKU, and brand - and make sure those values still line up with the live version after launch.
Check Rich Result Eligibility and Schema Health
After publishing, test at least one page for each template type: a simple product, a sale product, an out-of-stock product, and a product with variants [4][5]. That small sample can catch Liquid logic problems that only show up in certain product states.
Use these tools to review eligibility and schema health:
- Google Rich Results Test for rich result eligibility
- Schema.org Validator for structure problems
- Google Search Console Enhancements for sitewide errors
- Schema Validator AI for bulk URL audits and schema health scoring
Watch for Changes That Can Break Bulk Schema
Most schema issues don’t come from the first setup. They usually show up after normal store changes.
| Trigger | What Breaks | Fix |
|---|---|---|
| Theme update | Custom schema overwritten | Re-check page source for application/ld+json right away |
| Price or sale change | Old price data | Make sure schema uses dynamic Liquid variables |
| Inventory change | Availability mismatch | Check that availability matches actual product status |
| New SEO app installed | Duplicate Product blocks | Run Rich Results Test to look for duplicate Product blocks |
| New blog or collection template | Missing schema mapping | Map the schema type to the new template before publishing |
Theme updates are one of the easiest ways to lose custom schema. A standard Shopify theme update can quietly overwrite edits made directly to theme.liquid or section files [2]. After every theme update, check your page source and confirm that your application/ld+json snippets are still rendering.
Key Takeaways for Bulk JSON-LD on Shopify
Your post-launch workflow stays the same. Audit first so you know what schema is already on the site before you add anything new. Map schema types to templates - Product for product pages, Article for blog posts, and CollectionPage for collections. Generate reusable JSON-LD with AI, then connect each dynamic field to a Liquid variable so prices, availability, and SKUs stay synced on their own. Test in a duplicate theme before publishing. Then revalidate on a regular basis, especially after theme updates, product changes, or new app installs.
FAQs
How do I avoid duplicate Product schema in Shopify?
First, check whether your Shopify theme already outputs Product JSON-LD. Open a product page, view the page source, and search for application/ld+json.
If markup is already there, edit that code instead of dropping in a second block. Search your theme files for schema.org/Product - you’ll often find it in sections/main-product.liquid or snippets/structured-data.liquid - and remove any old code that conflicts.
Which Shopify pages need JSON-LD schema first?
Start with Product pages. They hold the main sales details Google uses for Rich Results, so add full Product schema with Offer and AggregateRating.
Then add FAQPage schema, because Shopify themes don’t create it by default. After that, work on Article and Collection pages, which many default themes leave a bit thin.
How often should I recheck my schema after launch?
Check your schema on a regular basis to keep it accurate and free of errors, especially after theme updates or big catalog changes. A weekly review in Google Search Console’s Enhancements section can help you spot site-wide issues early.
You should also validate individual pages any time you update product templates or your theme. Use Schema Validator AI to audit your markup and confirm it still supports Google Rich Results.