If you sell one item on one page, I’d add one JSON-LD Product block, match it to the visible page, and keep price, availability, and reviews in sync at all times.
That’s the short version. For a U.S. store, the markup should use:
name,image,brand, andsku- an
offersblock withprice,priceCurrency: "USD", and full Schema.org stock URLs - ratings or reviews only when shoppers can see them on the page
- one product page per markup block, not category or collection pages
A few rules matter most:
- Use Product schema on single product pages only
- Use
Offerfor one price andAggregateOfferfor a price range - Use plain numeric pricing like
29.99, not$29.99 - Use stock values like
https://schema.org/InStock, notInStock - Validate your schema before launch and spot-check 10–20 pages before sitewide rollout
Google can use this markup for rich product results and Merchant Listings, but only when the data matches the page. If your schema says in stock and your page says sold out, that mismatch can block those results.
I’d treat this as a simple system: map visible product data to JSON-LD, publish one clean block per page, validate it, and update it whenever price or inventory changes. For long-term maintenance, follow a schema markup audit checklist to catch errors before they impact visibility.
How to Add Schema Markup for Products to Any Ecommerce Site Without Coding
sbb-itb-f4b2e1b
Required Product Properties
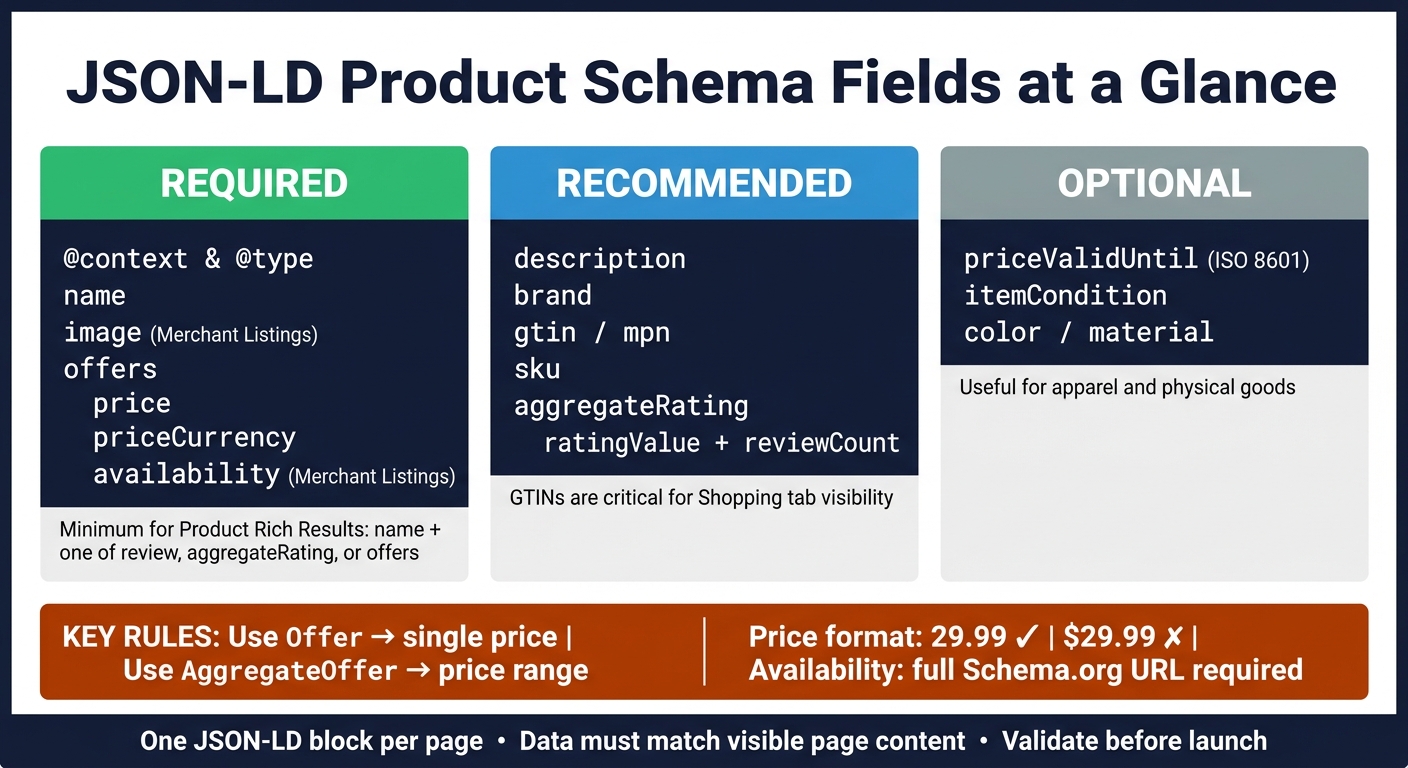
JSON-LD Product Schema: Required vs Recommended vs Optional Fields
Fields to Add First
Once you’ve confirmed the page is for a single product, build the core fields first.
Start with @context, @type, and name. Then add image, description, and offers.
Google’s minimum needs depend on the result type you want.
For Product rich results, Google requires name plus at least one of these: review, aggregateRating, or offers.
For Merchant Listings, the bar is higher. You need name, image, and a complete offers block that includes price, priceCurrency, and availability. If you’re aiming for shopping visibility, this is the stricter setup to follow.
Use the table below as a build order. Don’t treat it like a giant to-do list you must finish in one pass.
Required, Recommended, and Optional Fields Table
| Property | Priority | Notes |
|---|---|---|
@context & @type |
Required | Must be https://schema.org and Product |
name |
Required | Must match the visible product title on the page |
image |
Required for Merchant Listings | At least one crawlable image URL |
offers |
Required for Merchant Listings | Includes price, priceCurrency, and availability |
description |
Recommended | Helps shopping systems understand the product |
brand |
Recommended | Use a nested Brand or Organization object |
gtin / mpn |
Recommended | Critical for Shopping tab and to match products across sellers |
sku |
Recommended | Internal identifier; helps sync with Merchant Center |
aggregateRating |
Recommended | Enables star ratings; requires ratingValue and reviewCount |
priceValidUntil |
Optional | Use ISO 8601 format (YYYY-MM-DD) for sale prices |
itemCondition |
Optional | e.g., NewCondition, UsedCondition, RefurbishedCondition |
color / material |
Optional | Useful for apparel and physical goods |
Required for Merchant Listings, even though Google treats them as recommended for basic Product rich results.
Include GTINs when you have them. [3][7]
Data Accuracy and Visible Content Rules
Once the fields are in place, make sure every value matches what people can see on the page. That part matters more than it might seem.
Use a plain numeric price like 29.99, not $29.99. Set priceCurrency to USD for U.S. stores. For availability, use the full schema URL, such as https://schema.org/InStock or https://schema.org/OutOfStock, not plain text. [6][2]
If your stock status changes but the schema still says InStock, Google may drop the rich result. [1][6]
Only add aggregateRating or review when those reviews appear on the page.
Build the JSON-LD Script
Create the Product JSON-LD Block
Once you’ve got the required fields ready, put them into one JSON-LD script block. Add that markup inside a <script type="application/ld+json"> tag so the structured data stays separate from the visible HTML on the page.
"JSON-LD. Recommended. A JavaScript notation embedded in a <script> tag in the page head or body. The markup is not interleaved with the user-visible text, which makes nested data items easier to express." - Google Search Central [8]
Start with @context and @type. Then add the required product fields from the previous section, with offers nested inside the main Product object. Stick to one Product object per page so you don’t end up with duplicate markup from themes or plugins. [4]
A Simple Product Example
Use this structure as a starting point, then swap in the values from your own product page:
<script type="application/ld+json">
{
  "@context": "https://schema.org",
  "@type": "Product",
  "name": "Ergonomic Office Chair Pro",
  "image": "https://example.com/images/ergonomic-chair-pro.jpg",
  "description": "Fully adjustable ergonomic office chair with lumbar support and breathable mesh back.",
  "sku": "CHAIR-PRO-001",
  "brand": {
    "@type": "Brand",
    "name": "WorkComfort"
  },
  "offers": {
    "@type": "Offer",
    "price": "349.00",
    "priceCurrency": "USD",
    "availability": "https://schema.org/InStock",
    "url": "https://example.com/products/ergonomic-office-chair-pro"
  }
}
</script>
In this example, the price is a string, the currency is set to USD, and the markup uses full Schema.org URLs. The image and product url should point to live assets on the page.
Where to Place the Code on the Page
The best place for this code is the <head> section of the HTML, although Google can also read it from the <body>. If you can, use server-side rendering. Some crawlers won’t run JavaScript, so relying on client-side injection can be risky. [2][4]
How you add the code depends on your platform:
- Shopify: edit the
product.liquidtheme file or use an SEO app to inject dynamic JSON-LD. - WordPress: use a plugin or add a hook in
functions.phpwithwp_head. - Webflow and BigCommerce: use the custom code area or edit the product template with the platform’s variables.
Add Offers, Ratings, and Variants
After the core Product block, add only the offer, rating, and variant data that matches the live page.
Use Offer or AggregateOffer Correctly
Once the base Product markup is in place, pick the offer structure that lines up with the page.
Offer and AggregateOffer are used for different pricing setups. Use Offer when a product has one seller and one price. Use AggregateOffer when the page shows a price range or multiple sellers. AggregateOffer uses lowPrice, highPrice, and offerCount, while Offer uses a single price value.
| Schema Type | When to Use | Price Fields |
|---|---|---|
| Offer | Single product, single seller, or one specific variant | Single numeric value (for example, 349.00) |
| AggregateOffer | Price range or multiple sellers | lowPrice and highPrice |
Use USD and a full Schema.org availability URI, such as https://schema.org/InStock. The setup should match how the product is sold on the page. Simple as that.
Add Ratings and Reviews Only When Displayed
Add review markup only if ratings or reviews are visible on the page. If you include review markup, make sure it has the required fields, including ratingValue and either reviewCount or ratingCount.
If a product has no reviews, leave out aggregateRating completely. Reviews need to be about the specific product, not the store or the brand. And if you're using a third-party widget like Yotpo or Trustpilot, check whether it already outputs schema. If it does, you don't want duplicate AggregateRating blocks floating around.
Pull price, availability, and priceValidUntil from the same source as the visible page.
Next comes variants. This is where things can get messy fast if prices get mixed across products.
Handle Product Variants Without Creating Confusion
Use ProductGroup for the product family and Product for each sellable variant. If the product has options like size, color, or material, set up ProductGroup as the parent and nest each variant with hasVariant. Use variesBy to show what changes, such as https://schema.org/size or https://schema.org/color. Each child Product should point back to the parent with isVariantOf.
Give every variant its own Offer so price and availability stay tied to that exact option. For example, if Size L is out of stock but Size M is still available, the markup should show that difference. Don't model size or color choices as multiple Offer objects under one Product. Instead, use ProductGroup, hasVariant, and one Offer per variant.
Once the variant setup matches the page, validate the final markup. If you are new to the process, review these schema markup basics to ensure your implementation is sound.
Validate and Maintain the Markup
Validate Before Publishing
Once your markup matches the live product page, test it before launch. Start with Google Rich Results Test to see if the page is eligible for rich results. Then run the same markup through Schema Markup Validator to catch Schema.org syntax issues [1][8].
Before rolling this out across your full catalog, test a sample of 10–20 product pages. That small check can save you from pushing the same formatting mistake to thousands of URLs [6][5].
A few common problems tend to pop up:
priceis set as a number instead of a string- availability uses
"InStock"instead of the full URIhttps://schema.org/InStock priceCurrencyis missing [2]
If the markup passes, don’t just set it and walk away. Prices and inventory move, and schema can drift out of sync fast.
Keep Price and Inventory in Sync
After validation, make sure the structured data stays aligned with the live product data. Static schema goes stale when price or inventory changes. The safest move is to generate JSON-LD from the same product data source that powers the visible page, then refresh it any time the price, stock status, or priceValidUntil changes.
On Shopify, connect Liquid variables straight to the product price and inventory fields.
It also helps to watch priceValidUntil closely. If that date has already passed, Google may stop showing the price in rich results [2].
After launch, check Google Search Console every week. The Products and Merchant Listings reports under Enhancements can flag site-wide errors and warnings across the full catalog [1][8].
Use Schema Validator AI for Beginner-Friendly Validation
If you want a simpler check, use Schema Validator AI on the same markup. It reviews existing Product schema against Google Rich Results rules and can generate JSON-LD for platforms like Shopify, WordPress, and Webflow.
FAQs
How often should I update product schema?
Update product schema on a regular basis, especially when pricing, availability, or other key details change.
It also helps to monitor and validate your markup every week so it stays eligible for rich results.
What should I do if my product has variants?
Use structured data to show variants the right way. In most cases, the best setup is a ProductGroup with nested Product variants. Each variant should have its own offers, sku, and other product details, and point back to the parent with isVariantOf.
For simpler setups, you can place multiple Offer objects inside one Product. But if variants have different prices or differ in a more meaningful way, separate URLs with full schema markup often make more sense.
Can I use product schema on category pages?
No. Google says Product schema belongs on pages about one specific product. It should not go on category pages or listing pages that show multiple products.
Think of it this way: a product page is about one item. A category page is more like a shelf with many items on it. Those pages need different markup.